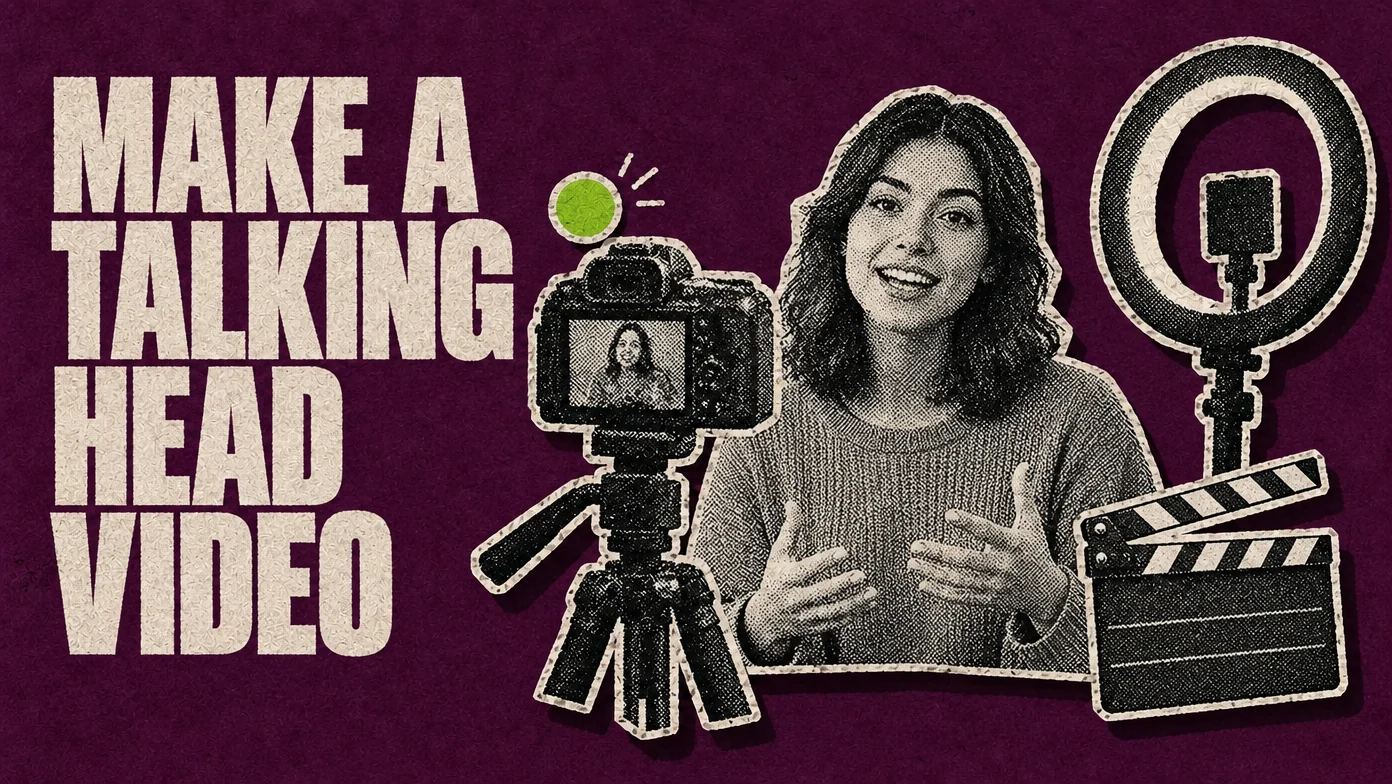
A talking head video is one person speaking to camera, and most of its quality is decided before the edit. To make one, plan a single message, film it with the lens at eye level, soft light in front of you and a microphone close to your mouth, and repeat any sentence you stumble on. Then edit in a fixed order: cut the retakes and long pauses, cover the jump cuts, add captions and export. You need a phone or camera, something to hold it steady and a microphone. Everything else is an upgrade.
This guide covers the whole job, from the first draft of the script to the exported file. The editing steps are shown in ChatCut, using two of its Skill demos as before-and-after examples, and each one is described so you can repeat it in any editor. If you are still choosing an editor, our comparison of AI tools for talking-head editing covers that question.
How to make a talking head video
- Plan one message. A hook, three beats and one next step, with the shots viewers will see written beside the words.
- Set up once. Lens at eye level, face the light, mic close, a tidy background with some depth.
- Record in sections. One beat at a time; when you stumble, pause and restart the whole sentence.
- Edit the speech first. Cut retakes and dead air, then cover jump cuts, then add captions, then fix the pacing.
- Export and watch the file. Check every cut and caption in the exported video, not the timeline.
Plan one message and a clear ending
A talking head video holds attention when it makes one point. Two points in one video usually means two videos. Before you write anything, answer three questions: who is watching, where will they watch it, and what should they do afterwards. The answers set the shape (16:9 for YouTube and websites, 9:16 for Shorts, Reels and TikTok), the length and the last line.
Then write the script as a hook, three beats and a next step:
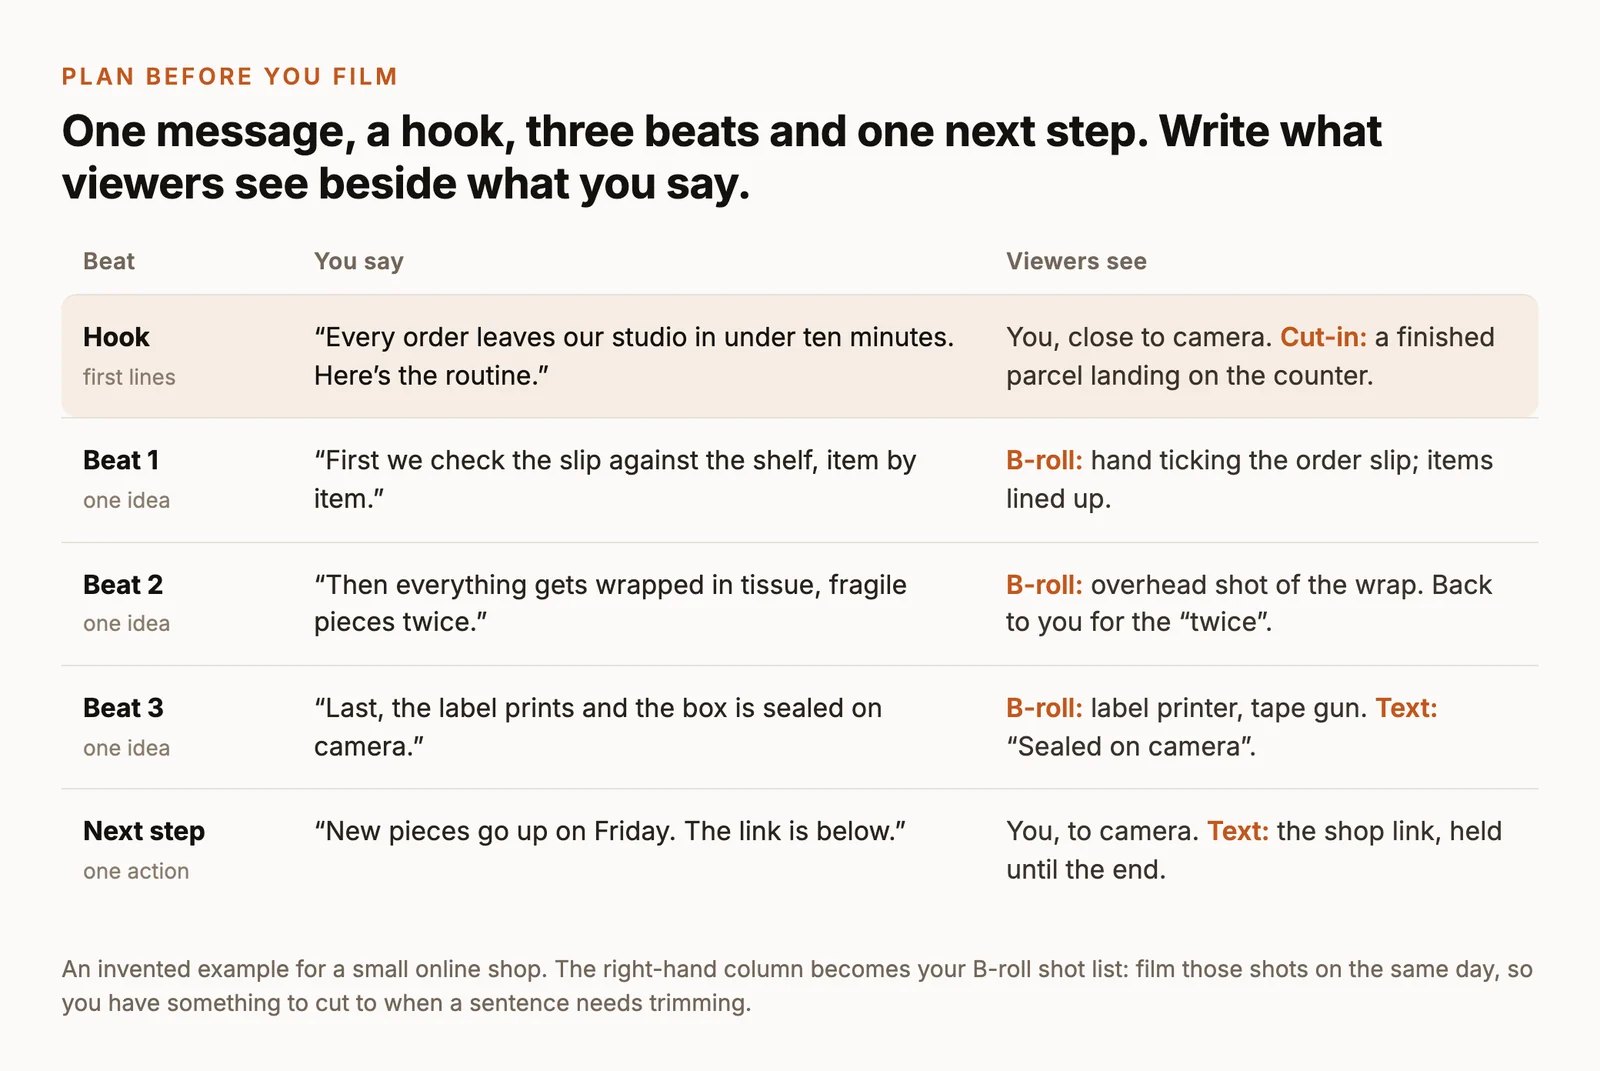
- The hook states the promise in the first lines. Put the most interesting thing first, not a greeting.
- Each beat carries one idea. If a beat needs two sentences of setup, it is two beats.
- The next step is one action: watch the next video, visit a link, reply with a question.
Write for speaking, not reading. Use short sentences and the words you would actually say, then read the script aloud once and rewrite any line that makes you stumble. Decide whether you will read word for word or speak from bullet points. A full script suits exact wording such as product details or prices. Bullets sound more natural but take more retakes. If you read, use a prompter app placed as close to the lens as you can, so your eyes stay on the viewer.
The right-hand column matters as much as the script. Every shot you list there is something to cut to later when a sentence needs trimming, and it is far easier to film those shots on the same day than to find them afterwards.
Set up camera, light and audio
Put the lens at eye level
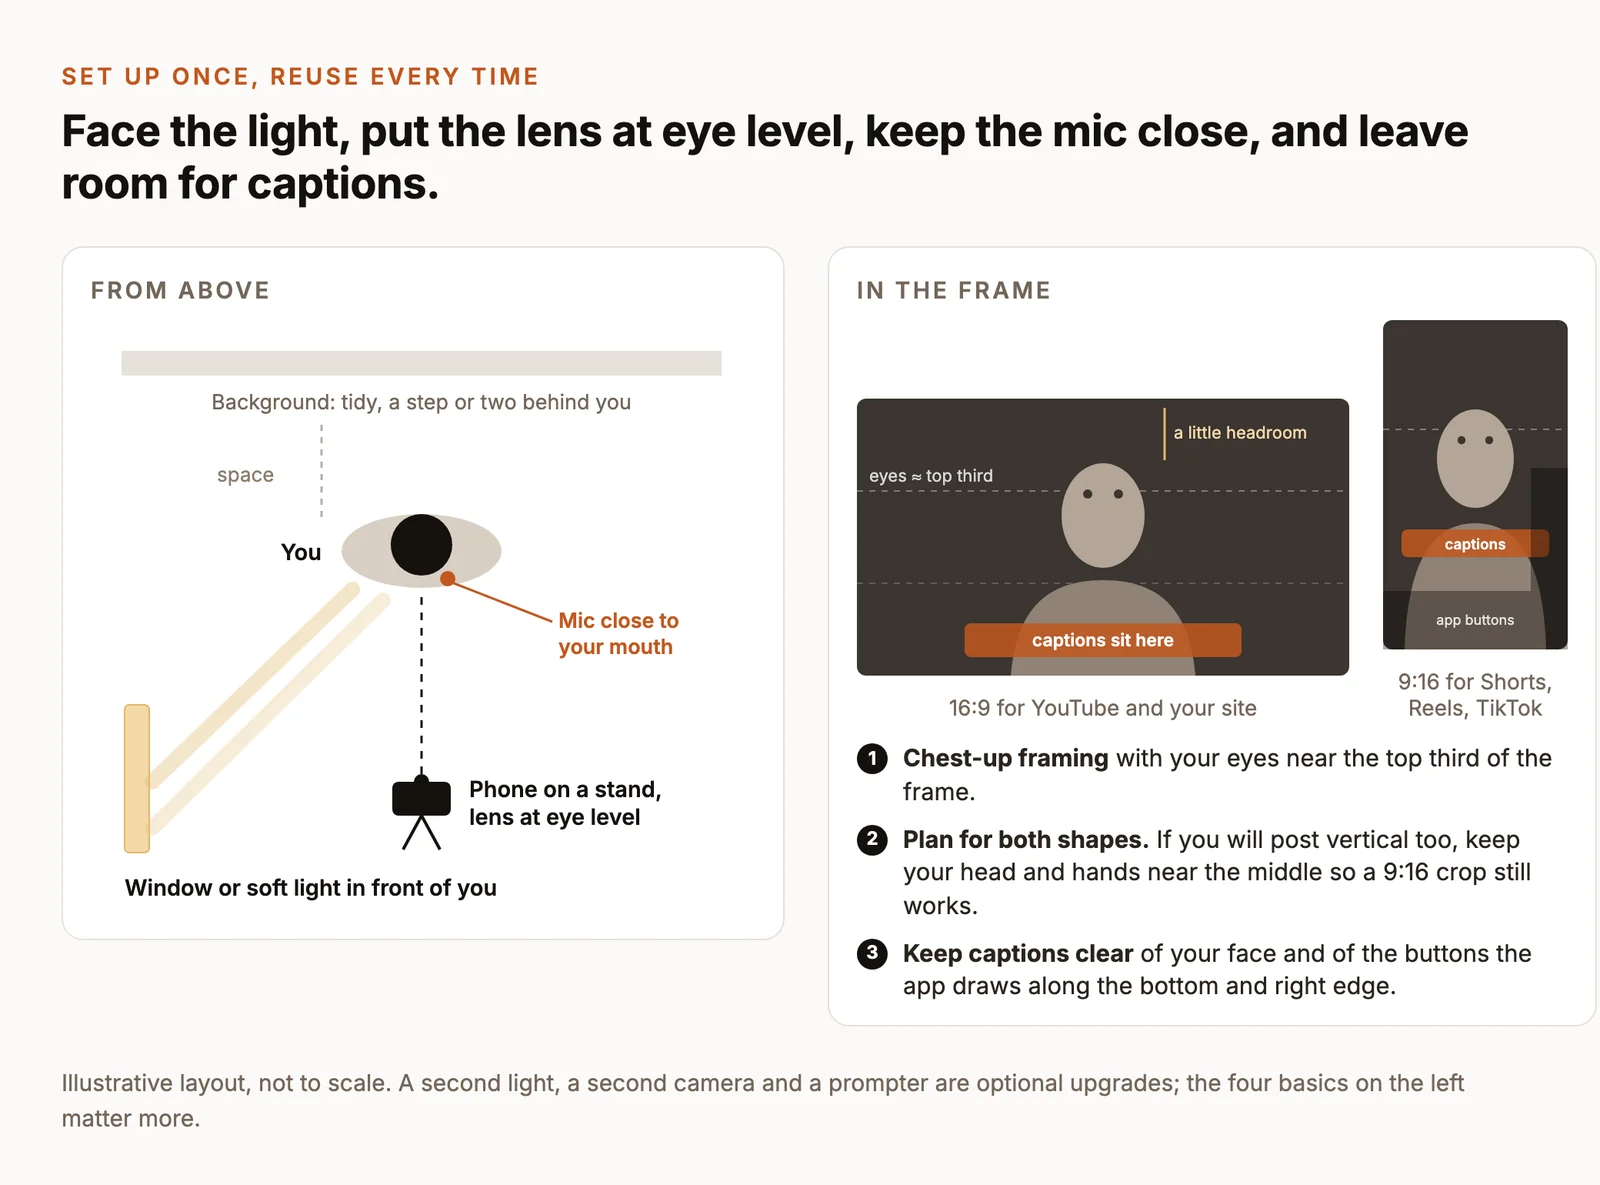
Mount the phone on a tripod or stand with the lens level with your eyes. A lens below your chin looks up your nose; a lens far above looks down on you. Frame from the chest up with your eyes near the top third of the picture and a little space above your head.
Shoot in the shape you publish most. If you need both, film 16:9 and stay near the middle of the frame so a vertical crop still works. Shoot in 4K if you can: a 9:16 crop from 1080p landscape footage is only about 608 pixels wide, while the same crop from 4K is about 1,215 pixels wide, more than a full 1080 × 1920 vertical frame needs. The extra resolution also lets you zoom in on alternate cuts later.
Lock focus and exposure so they don’t drift when you move your hands. On an iPhone, touch and hold your face on the screen until AE/AF Lock appears; most Android camera apps have a similar lock. Use the rear camera if you can frame yourself without watching the screen; it is usually the better one. Keep the same frame rate for every clip in the video; 30 fps is a sensible default.
Face soft light
Sit facing a window, or put one soft light in front of you and slightly to one side. Light from the front fills your face; light from behind turns you into a silhouette; overhead room lights alone leave shadows under your eyes. If the side away from the light is too dark, add a second, weaker light or a white surface on that side. A ring light or a second camera is an upgrade, not a requirement.
Move a step or two away from the wall. Your shadow drops out of the frame, and the background reads as a place rather than a surface. Keep that background tidy and a little personal: a shelf, a plant, a lamp.
Put the microphone close
If you can improve only one thing, improve the sound. A slightly soft picture is easy to watch; muddy speech is not. The cheapest fix is distance: a clip-on lavalier on your chest, or a USB or shotgun mic just outside the frame, picks up much less room echo than the phone’s built-in mic several feet away. Rugs, curtains and a sofa absorb echo; bare walls and hard floors reflect it. Switch off fans, air conditioning and notifications before you start.
Record a 15-second test, then play it back with headphones. Listen for echo, hum and distortion on loud words, and look at the framing and exposure. Fixing a setup problem now takes a minute; fixing it in the edit takes much longer and rarely works as well. If a recording already has fan noise or hum in it, our guide to removing background noise from video covers the fixes.
Record in sections that are easy to edit
How you record decides how easy the edit is. A few habits make the difference:
- Let the camera roll through the warm-up. The first takes are usually stiff. Don’t stop to restart the camera; keep going until you settle.
- Record one beat at a time. Shorter sections mean fewer lines to remember and smaller retakes.
- Restart the whole sentence. When you stumble, stop, pause for a second, and say the full sentence again from its first word. A clean pause before a complete sentence gives the edit a clean place to cut. Restarting mid-sentence leaves joins that are hard to hide.
- Look at the lens, not the screen. Your eyes on the lens are the viewer’s eye contact.
- Film the right-hand column. Straight after the talking, record the B-roll from your plan. Hold each shot for at least five seconds so you have room to trim.
Before you pack up, copy the files and play one back with sound. It is the last moment a missing audio track costs nothing to fix.
Edit the speech before adding polish
Edit in a fixed order: speech first, then picture, then text. Every cut you make to the speech moves everything after it, so B-roll and captions placed before the speech is final have to be placed again.
You can do this in any editor that shows a transcript or a timeline. In ChatCut, which runs as a desktop app for macOS and Windows and in the browser, import the files with My Assets → Upload → Files… (or From phone… to send them straight from your phone), place the main take on the timeline and open Transcript. If the panel is hidden, use Workspace → Transcript. Deleting words in the transcript removes the matching stretch of video from the timeline; your source files are never changed. The Talking Head Edit guide has the full panel reference.
Cut retakes and false starts
Read through the transcript and keep one take of each sentence. The last complete take is usually the best, but listen before you decide: sometimes the first one has the energy. Select the takes you are dropping and press Backspace or Delete. Clicking any word jumps the playhead there, so you can check the join straight away.
On a long recording, ask the agent for the first pass and review its cut instead. Type @ in the chat box and pick your clip in place of @interview:
Agent edits use ChatCut credits even when all the footage is yours, so check your balance and any confirmation before it runs. Then play the result from the first word to the last with sound on. A shorter running time doesn’t prove a good cut; a clipped syllable or a missing qualifier can change what you said.
Shorten pauses, but keep the breaths
Long silences drag, but removing every pause makes speech sound breathless and hard to follow. Shorten pauses rather than deleting them, and leave a beat before your key points and at the end of each beat. In ChatCut’s transcript, the pause control applies one pause length across the selected track. It can bring back pause time that exists in the recording, but it can’t invent silence that was never there. For filler words and the cases where you should leave them in, see our guide to removing silences and filler words.
Fix a wrong word without re-recording
Sometimes a take is perfect except for one word: the wrong day, a misspoken name, a number that came out wrong. Re-recording the sentence means matching your energy, light and framing again. The alternative is to replace only that word.
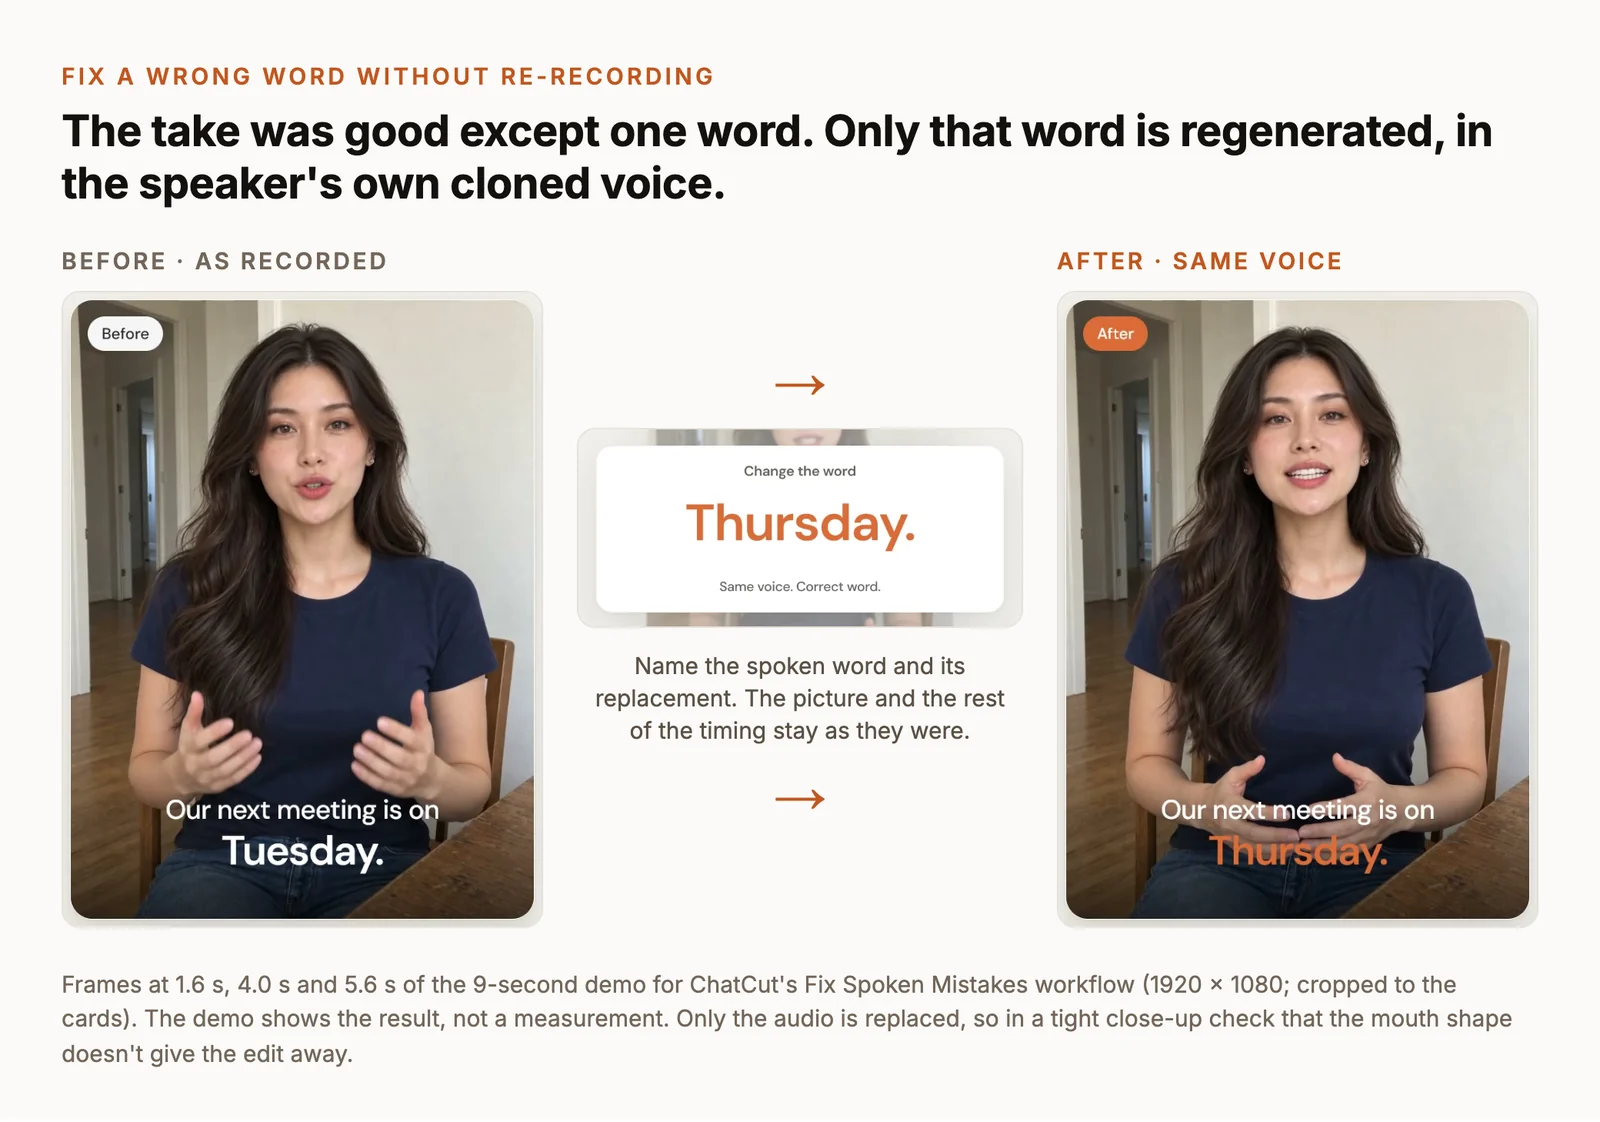
In ChatCut, tell the agent what you said and what you meant, for example: “At 00:42 I said Tuesday but meant Thursday. Replace only that word in my own voice and keep everything after it where it is.” It generates the corrected word with a cloned voice of the speaker, fits it into the same slot and shows you the region to review. Cloning needs the speaker’s permission; if the project has a clear passage of their speech, the agent can clone from that instead of asking for a new recording. Generation uses credits.
Two limits are worth knowing. Only the audio changes, so in a tight close-up check that the mouth shape doesn’t give the edit away; cut to B-roll over the word if it does. And if the mistake is only in the transcript or captions, not in what you said, correct the caption text instead. Deleting words in the transcript cuts the video.
Cover jump cuts with B-roll
Every cut inside one continuous shot makes your head jump slightly. You have four choices:
- Leave them. In fast social videos, visible jump cuts are part of the style.
- Cover them with B-roll. Put a shot from your plan on the track above, spanning the cut, and keep your voice underneath. Choose a shot that shows what you are saying at that moment.
- Punch in. Scale every other section up slightly so each cut becomes a change of shot. This is where 4K footage pays off.
- Cut to a second angle, if you filmed one.
In ChatCut, drag B-roll from My Assets or Library onto a track above your main clip, or ask: “Use @broll to cover the visible jump cuts, only where the shot matches what I’m saying, and keep my voice as the only audio.” Then watch every covered cut: B-roll that arrives a beat late or illustrates the wrong sentence is worse than the jump.
Add captions and check every word
Captions let people follow the video with the sound off, and they are essential for viewers who are deaf or hard of hearing. In ChatCut, turn them on with the Captions control below the Viewer, open the chevron to pick a style such as Plain, Netflix or TikTok Pop, and correct mistakes in the caption’s Content panel, which has search and replace.
Read every caption against the audio. Speech recognition gets names, brands and numbers wrong most often. Keep captions to two short lines, off your face, and above the buttons that Shorts, Reels and TikTok draw along the bottom and right edge. Our guide to adding subtitles covers burned-in captions versus SRT files in detail.
Tighten the pacing
Watch the whole video once at normal speed without stopping, and note every moment your attention drifts. The usual fixes:
- Cut the first sentence if it is a warm-up. Many videos improve by starting at the second line.
- Trim anything after the next step. Once you have asked viewers to act, end.
- Change what is on screen when the point changes: B-roll, a screen recording, a simple title or a tighter shot.
- If you add music, keep it well under the voice and stop it when it competes with a key line.
Export and watch the whole thing
Choose settings for where it is going
Pick the shape before you export. In ChatCut, set Aspect Ratio → 9:16 below the Viewer for a vertical version and check that your face and captions still fit. Then open Export → Video.
- YouTube or your website (16:9). MP4 with H.264, at the frame rate you recorded, in 1080p or 4K. YouTube’s upload recommendations ask for MP4 and H.264 and for uploading at the recorded frame rate.
- Shorts, Reels and TikTok (9:16). Captions burned into the picture and kept clear of the app’s buttons.
- Anywhere viewers can switch captions on. Also export Export → Subtitles → SubRip (.srt) and upload the file alongside the video.
In ChatCut Desktop, choose resolution (480p to 4K), frame rate, bitrate and range, then pick a folder; the render runs on your computer, so keep the app open until it finishes. Exports from the web editor that render in the cloud go up to 1080p. Exporting doesn’t use credits, though free accounts have a 60-minute cumulative allowance for cloud exports. The export guide lists every option.
Watch the exported file, not the timeline
Open the exported file in an ordinary player and watch it through, once on headphones and once on a phone speaker. Check:
- The first second. Does it start on a word, not mid-breath?
- Every cut. No clipped syllables, no doubled words, no jump in the audio level.
- Every caption. Spelling of names and numbers, and nothing covered by the platform’s buttons.
- The ending. It stops soon after the last line, with no dead air.
- The vertical version, if you made one. Your head and hands are inside the frame.
Fix what you find in the project, export again, and keep the editable project. The next video in the series can reuse its setup, caption style and structure.