To remove background noise from video, work on the sound, not the picture. Put the speech on its own clip, run a speech cleaner on that clip only, then compare it with the original at the same volume before you export. The right cleaner depends on the noise. AI speech cleaners, such as ChatCut’s AI Voice Isolation, Premiere’s Enhance Speech, Voice Isolation in DaVinci Resolve Studio and Audio Mix on recent iPhones, handle fans, hum and traffic around a voice; in our test, ChatCut’s removed background music as well. Audacity is the free choice for steady hiss and hum.
This guide starts with identifying the noise, then gives exact steps for six tools, then a listening check. Menu paths were checked against each vendor’s documentation on November 4, 2026. We also ran ChatCut’s AI Voice Isolation on a test clip and measured what it removed. The other tools are documented here, not tested.
Key Takeaways
- Name the noise first. Steady hiss and hum are the easiest to remove. Wind and a second voice over the words are the hardest. Distortion from recording too loud can’t be removed at all.
- AI voice isolation keeps what sounds like speech and suppresses the rest. In our test it lowered fan noise and hum in the pauses by 59 dB while the voice level moved by half a decibel, and it removed a music bed just as completely.
- Clean the dialogue clip, not the whole mix. Keep music and sound effects on their own tracks.
- Judge the result at matched loudness, on headphones and on a phone speaker, and listen to quiet words and breaths, not just the gaps.
- Free routes: Audio Mix on an iPhone 16 or later, CapCut, and Audacity. Voice Isolation in DaVinci Resolve needs the paid Studio version.
Identify the noise before you fix it
“Background noise” covers sounds that need different fixes. Play a few seconds where nobody talks, then a few seconds of speech, and match what you hear:
- Steady hiss or “shhh”. Usually mic hiss, a fan or air conditioning. Use AI voice isolation or a noise-profile tool, then listen for lisping or watery S sounds.
- A low hum or buzz. Usually mains hum at 50 or 60 Hz and its multiples. AI voice isolation or a hum filter removes it; check that it doesn’t creep back in the pauses.
- A hollow, distant voice. That’s room echo. Some AI speech cleaners also reduce reverb (Descript’s Studio Sound and the iPhone’s Studio mix are documented to), but an over-dried voice can sound pasted onto the picture.
- Traffic, keyboard, dishes or wind. Noise that changes from moment to moment. AI voice isolation can follow it; a noise-profile tool can’t learn it. Listen for bursts that survive under the words.
- Music under the voice. Voice isolation removes it along with everything else, so use it only if you want the music gone.
- Another person talking. Voice isolation is built to keep voices, so it won’t separate two people talking at once. Look for a different take.
- Crackle on loud words. That’s clipping from recording too loud. It isn’t noise, and none of these tools can undo it; re-record the line.
Two habits make every method below work better. Process a copy of the dialogue clip, so you can always go back. And keep music, sound effects and ambience on separate tracks, so the cleaner never sees them.
If by “noise” you mean grain or speckle in the picture, that’s video noise. It needs a video denoiser, not the audio steps in this guide.
Choose a method
- ChatCut: AI Voice Isolation. ChatCut Desktop (macOS, Windows) or the web app; no separate price documented. On or off per clip. Best for dialogue in an edit you’ll keep working on.
- Adobe Premiere: Enhance Speech and DeNoise. macOS and Windows, subscription from US$22.99/month. Mix Amount and Reduction controls. Best when the project is already in Premiere.
- DaVinci Resolve Studio: Voice Isolation. macOS, Windows and Linux, paid Studio license. An Amount control, per clip or per track. Best when the project is already in Resolve.
- CapCut: noise reduction. Web, desktop and mobile, advertised as free. A toggle or slider for quick social edits.
- iPhone Photos: Audio Mix. iPhone 16 or later, free. A strength slider, only for clips recorded with Spatial Audio.
- Audacity: Noise Reduction. Windows, macOS and Linux, free and open source. Reduction, sensitivity and smoothing controls for steady hiss and hum.
Premiere’s price is Adobe’s single-app plan billed annually and paid monthly, as listed on Adobe’s noise-removal page. Blackmagic listed Resolve Studio at $236, down from $295, on its Studio page on the check date.
Remove background noise from video in ChatCut
ChatCut’s AI Voice Isolation is a switch on each clip. It suppresses everything around the spoken voice, leaves the picture alone, and can be undone at any time. It’s meant for dialogue, interviews and voiceover, not music or ambience (Timeline docs; feature overview on the AI noise removal page).
- Put the video on the timeline. If music or sound effects are part of the edit, keep them on their own tracks.
- Select the clips that contain speech. Video clips with sound and audio clips both work, and you can select several at once.
- Right-click and choose AI Voice Isolation. Wait for Isolating voice… to finish.
- Play it back, including a pause and a quiet sentence. If you don’t like it, right-click and choose Restore original audio.
- Export with Export → Video. Playback and export use the cleaned audio; your original file isn’t changed.
One catch: if you later drag a trimmed clip longer than the part that was processed, ChatCut may play the original audio for the new range and show a warning. Apply AI Voice Isolation again to cover it.
If you edit through an AI agent, ChatCut’s own or Claude Code or Codex connected to ChatCut, you can ask for the same thing in plain language:
ChatCut’s documentation doesn’t list a separate credit price for AI Voice Isolation, and our two test runs on a paid account posted no credit charge. If cost matters, check Credits history on your own account after a run.
What it did to a noisy test clip
To see what the switch actually removes, we took a clean 6.5-second line of speech from our Speech Cleanup demo and padded it with silence. Then we made two versions: one with synthetic fan noise plus 60 Hz mains hum, mixed 13 dB below the voice, and one with a music bed 12 dB below the voice. We applied AI Voice Isolation in ChatCut Desktop and exported both as WAV files.
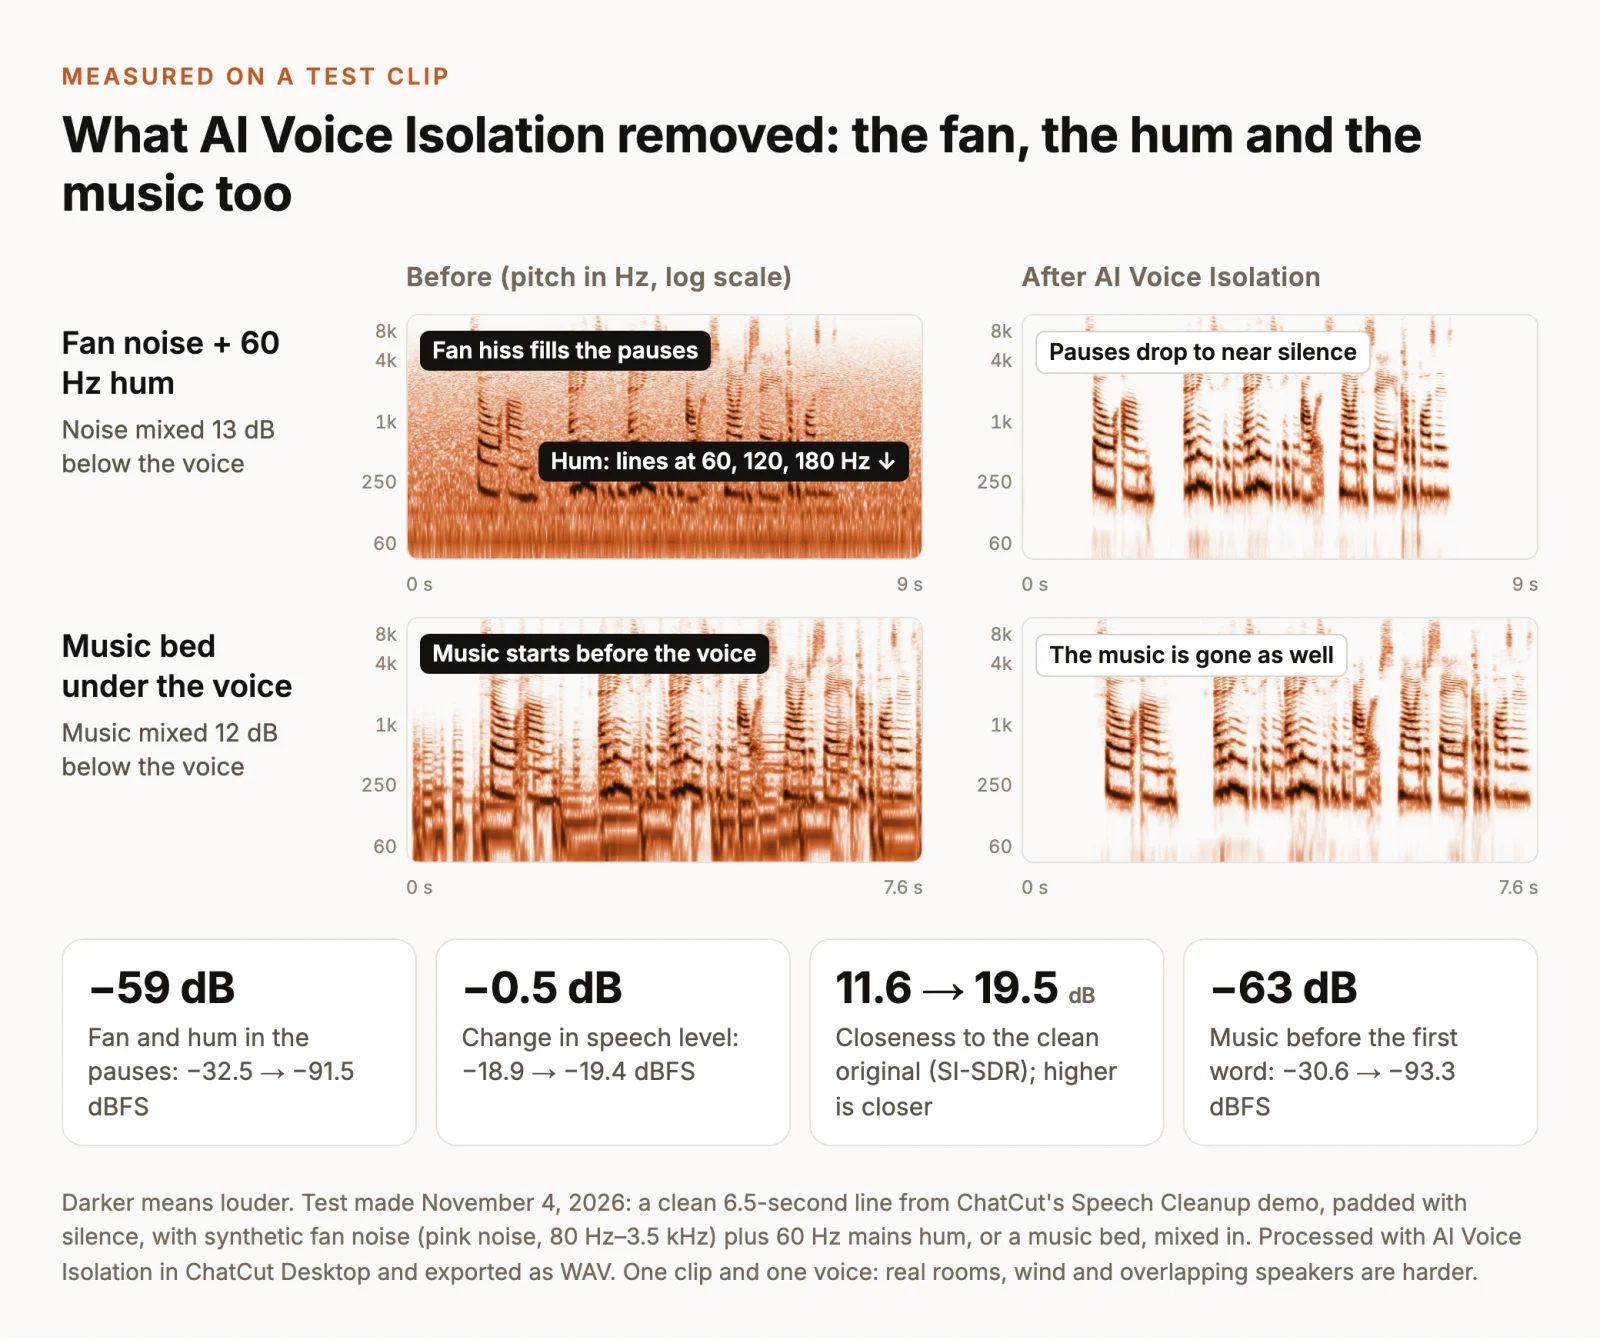
The fan and hum in the pauses dropped from −32.5 to −91.5 dBFS, which is effectively silence, while the speech level moved from −18.9 to −19.4 dBFS. We also compared each version with the clean original using SI-SDR, a standard measure of how closely processed audio matches a reference: the noisy track scored 11.6 dB and the cleaned one 19.5 dB. A speech-recognition pass with whisper.cpp returned the same words from the cleaned audio as from the clean original.
The music result is the part to remember. The model treats everything that isn’t a voice as noise, so the music bed disappeared as completely as the fan. If you want to keep music, don’t run isolation on a clip that contains it. Isolate the dialogue clip and keep the music on its own track. This was one voice with steady, synthetic noise; a real room with echo, wind or two people talking will be harder.
Use Enhance Speech or DeNoise in Adobe Premiere
Adobe Premiere, called Premiere Pro until early 2026, has two tools. Enhance Speech is the AI route. DeNoise is a conventional effect for steady noise with a strength control.
Enhance Speech (Adobe help):
- Select the dialogue clip on the timeline.
- Open Window → Essential Sound. If the clip isn’t tagged yet, choose Dialogue.
- Under Enhance Speech, select Enhance. A progress bar shows the analysis, which runs in the background while you keep editing.
- Adjust Mix Amount to blend the enhanced and original audio. If the voice sounds processed, lower it to bring back some of the original.
DeNoise (Adobe’s walkthrough):
- Open Window → Effects and select the clip.
- Double-click Audio Effects → Noise Reduction/Restoration → DeNoise.
- In Effect Controls, select Edit and turn up the reduction gradually. Adobe’s own example sets it to −10 dB.
The Essential Sound panel also has a Reduce Noise slider under Repair, a quicker version of the same idea.
Use Voice Isolation in DaVinci Resolve Studio
Voice Isolation is part of the paid DaVinci Resolve Studio, not the free version. The steps below follow Blackmagic’s DaVinci Resolve 21.1 reference manual (the Edit page Inspector chapter and the Fairlight FX chapter):
- On the Edit or Fairlight page, select the dialogue clip. It works on mono, stereo and dual-mono audio, not on tracks with more than two channels.
- Open the Inspector, go to the Audio tab and turn on Voice Isolation.
- Set Amount. It mixes the original with the isolated voice: at 50 they’re roughly equal, and Blackmagic suggests 70 to 80 for a natural result that still isolates strongly.
- To treat a whole track, use Voice Isolation in the Track FX section of the Fairlight mixer, or switch the Inspector to track mode.
If the control doesn’t appear, check that you’re running Studio and that a clip or track is selected. Blackmagic’s manual lists music playing under dialogue among the sounds it removes, the same trade-off as in our ChatCut test.
Reduce noise in CapCut
CapCut has noise reduction on the web, on desktop and on mobile (CapCut):
- Web: upload the video, drag it onto the timeline and select it. Open the Audio tab in the right-hand panel, turn on Noise reduction, preview, then Export.
- Desktop: select the clip, open the Audio controls and turn on Reduce noise (CapCut FAQ).
- Mobile: CapCut doesn’t publish official steps for this. Select the clip and look for Reduce noise in the toolbar under the timeline.
CapCut’s own advice applies to every tool here: if the voice starts to sound robotic or underwater, the reduction is too strong, so back it off. CapCut advertises the online tool as free but doesn’t state limits or watermark rules on that page, so check the export screen before you rely on it.
Use Audio Mix on an iPhone
Recent iPhones can do this in the Photos app, as long as the video was recorded on an iPhone 16 or later with the Spatial Audio recording option (Apple):
- Open the video in Photos and tap the edit button.
- Tap Audio Mix.
- Choose In-Frame to reduce sounds and voices from sources you can’t see, or Studio to reduce background sound and room reverb. Cinematic puts voices up front and leaves the surroundings in surround; Standard is the original.
- Drag the slider under the options to set the strength, then tap Done.
Clips from older iPhones, or recorded with a different sound option, don’t offer Audio Mix. Use CapCut on the phone or clean the audio on a computer instead.
Remove steady noise for free with Audacity
Audacity is a free audio editor for Windows, macOS and Linux. It edits sound only, so this is a round trip: take the audio out, clean it, and put it back under the picture.
- Bring the audio in. In Audacity 4, File → Import reads the audio from most video files (manual). Audacity 3 needs the free FFmpeg library for that; otherwise export a WAV from your video editor first.
- Teach it the noise. Select a second or two where nobody speaks, open Effect → Noise removal and repair → Noise reduction, and choose Get noise profile.
- Apply it. Select the whole track and open Noise reduction again. Start near the defaults (6 dB of reduction), set Output to Noise only and preview. If you can hear words in what’s being removed, the setting is too strong. Switch back to Audio with noise removed and apply (manual).
- Export with File → Export audio as a WAV file.
- Put it back. In your video editor, place the WAV at exactly the same start as the clip, mute the original audio, and check lip sync at the beginning and the end.
Audacity learns one noise and removes that. Hum, hiss and an air conditioner work well; a door slam or a passing car isn’t in the profile, so it stays.
If you already edit in Descript, its Studio Sound effect (Audio Effects → Studio Sound, with an Intensity control) is another AI route; Descript documents it for both noise and room echo (Descript).
Check the result before you export
Every method above sounds impressive on the first listen. These checks tell you whether it actually helped:
- Match the loudness first. A louder version sounds clearer even when it isn’t. If the cleaned track came out quieter, raise it to match before you judge.
- Listen to the quiet parts. Soft consonants, breaths and the ends of sentences are where over-processing shows up as a lisp, a warble or a swallowed word.
- Use two speakers. Headphones reveal artifacts. A phone speaker tells you whether the words are clear where most people will hear them.
- Listen to the pauses. AI isolation can leave dead silence between sentences; in our test the pauses fell to about −91 dBFS. Cut against an untreated shot, that can sound like a dropout. Treat every clip from the same scene, or lay a little room tone under the cut.
- Check what else disappeared. Music, ambience or a laugh you wanted can go with the noise.
- Check sync if you round-tripped the audio through another app, at both ends of the clip.
- Keep the original. Don’t overwrite your source file, so you can try a lighter setting later.
Some problems are beyond any of these tools: a second voice talking over the speaker, wind hitting the microphone, a siren over a key word, or distortion from recording too loud. If a line is lost, use another take, re-record it, or cover it with a cutaway and a caption.
Then tighten the edit
Noise removal fixes the sound under the words. Long pauses, filler words and repeated takes are a timing problem, and cutting them is a separate pass. Our guide to removing silences and filler words compares the tools for that job, and if you’re still choosing an editor for interviews and podcasts, see the tools we’d shortlist.