To make a lyric video, you need the final mix of the song, the approved lyrics and an editor that can place timed text over a background. The work happens in five steps: plan the look and choose a tool, split the lyrics into short phrases, design one section, time every phrase to the vocal, and export. Timing takes the longest and is what viewers notice first, so this guide spends the most time there.
It compares four routes (After Effects, CapCut, online lyric makers and ChatCut’s editable motion graphics) and says where each one fits. If you want performance or story footage rather than text, our guide to making a music video covers shoots and budgets.
How to make a lyric video
- Plan the video and pick a route. Decide how much the text moves, the shape, the background and the tool.
- Prepare the lyrics. Write down what is actually sung, split it into phrases and proofread it.
- Design one section. Style a verse and a chorus, and check them on a phone before you go further.
- Time every phrase to the vocal. Line timing first, word timing only where it earns its keep.
- Export and check. Render the YouTube version, then watch the exported file against your lyric sheet.
Plan the video and choose your route
A lyric video gives people the words while they listen. It works best for listeners who already like the song: CD Baby’s DIY Musician blog argues that lyric videos suit existing fans better than ads aimed at new ones. That suggests where to spend effort. A full-song 16:9 version for YouTube on release day, and a 9:16 cut of the chorus for Shorts, Reels and TikTok, cover most needs.
The biggest decision is how much the text moves, because it sets how precisely you have to time it:
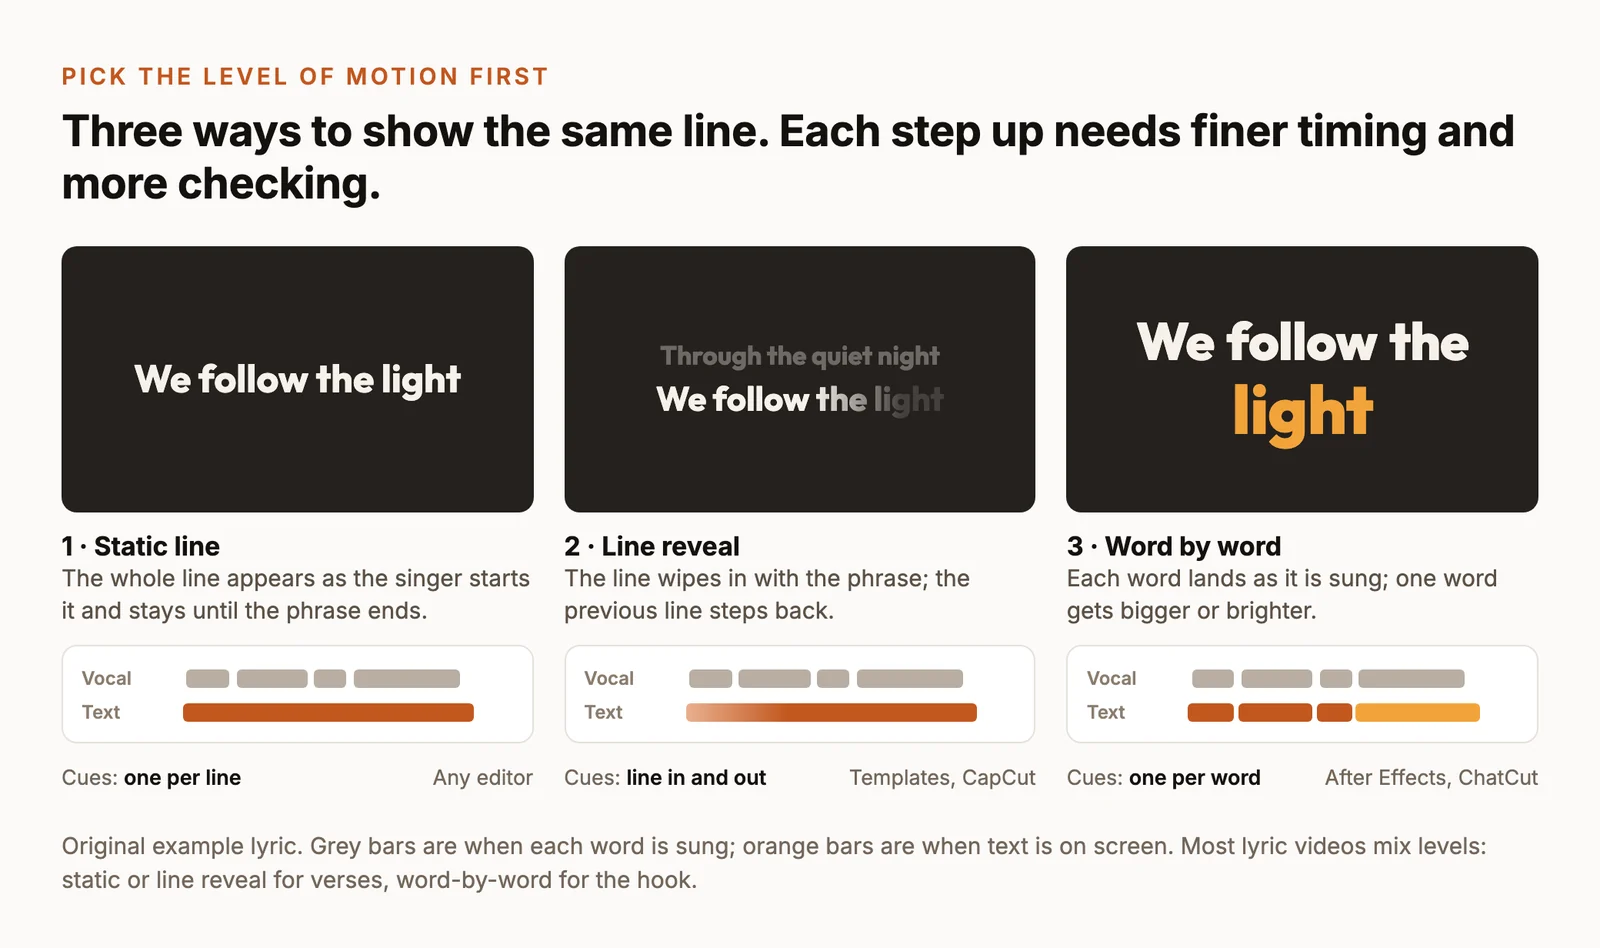
Pick the background next. A single image such as the cover art with a slow zoom, a calm footage loop or an abstract texture all work; anything busy fights the words. Whatever you choose, you need the rights to the song, the lyrics and every image or clip you use. Having access to a tool doesn’t clear any of them.
Then choose a route. All four can produce a finished lyric video; they differ in how the timing gets done and how much control you have over the motion.
- After Effects suits custom word-by-word and letter-by-letter animation. You set the timing yourself with keyframes against the waveform. Expect a steep learning curve and a paid Adobe subscription.
- CapCut suits quick edits in a familiar timeline. You drag each text clip to the vocal, and in the mobile app Auto Lyrics can draft the timing. Its help center says Auto Lyrics generates on mobile only, so check your version.
- Online lyric makers turn a template into a finished video in one sitting. Many estimate the timing from the vocal for you to correct. Watermarks, resolution and correction tools vary by plan.
- ChatCut builds editable motion graphics that you revise in plain language. You supply the cue times and the agent builds the graphics to them. Automatic timing for sung vocals isn’t documented, and generation uses credits.
One documented example shows the kind of limit to look for. VibeMV’s free lyric tool lists three lyric-sync requests per IP address per day, a watermarked 1080p 16:9 export, and a limit that matters: editing a line’s words keeps its old time span instead of re-timing it to the audio.
Prepare and proofread the lyrics
Start from the final recording, not the lyric sheet. Singers change words, repeat lines and add ad-libs, and the video has to match what people hear. Listen through once and write down every phrase as it is sung, including each repeat of the chorus.
Then split the text into phrases by breath, not by the line breaks of the written lyric. A phrase is what fits on screen at once and is sung without a pause, usually up to two short lines. Subtitle style guides give a useful ceiling: Netflix’s English timed text guide allows two lines, 42 characters per line and up to 20 characters per second for adult programs. A phrase sung in 2.4 seconds should stay under about 48 characters at that pace, and lyric phrases are usually much shorter.
Proofread before you design anything. Paste the phrases into a document with a spellchecker, then settle the house style: capitalization, whether lines end with punctuation, how you show repeats and ad-libs. Fixing a typo in a text file takes seconds; fixing it across forty animated graphics does not.
The last step of preparation is a cue sheet: one row per phrase with columns for the phrase, its in time, its out time, the word to emphasize and a note. The phrase and emphasis columns come from this step. The times come from the timing step below.
Choose a readable style and animate one section
Readability comes before style. Text has to be read in the second or two the phrase lasts, often on a phone:
- Contrast first. White or near-white on a dark background, or a dark band, shadow or blur behind the text over footage.
- One typeface, heavy weight. A bold sans-serif reads fastest at small sizes. Save decorative fonts for the title card.
- One accent color, used for the emphasized word only.
- Stay near the center. Keep text away from the edges, where vertical platforms draw their buttons.
Build one verse and one chorus, about 20 to 30 seconds, before you touch the rest of the song. Watch that section on a phone at arm’s length. If a phrase is hard to read there, it will be hard to read everywhere.
Kinetic type is where a lyric video gets its energy, and the moves are reusable. This product launch demo from one of ChatCut’s Skills shows four that translate directly to lyrics:
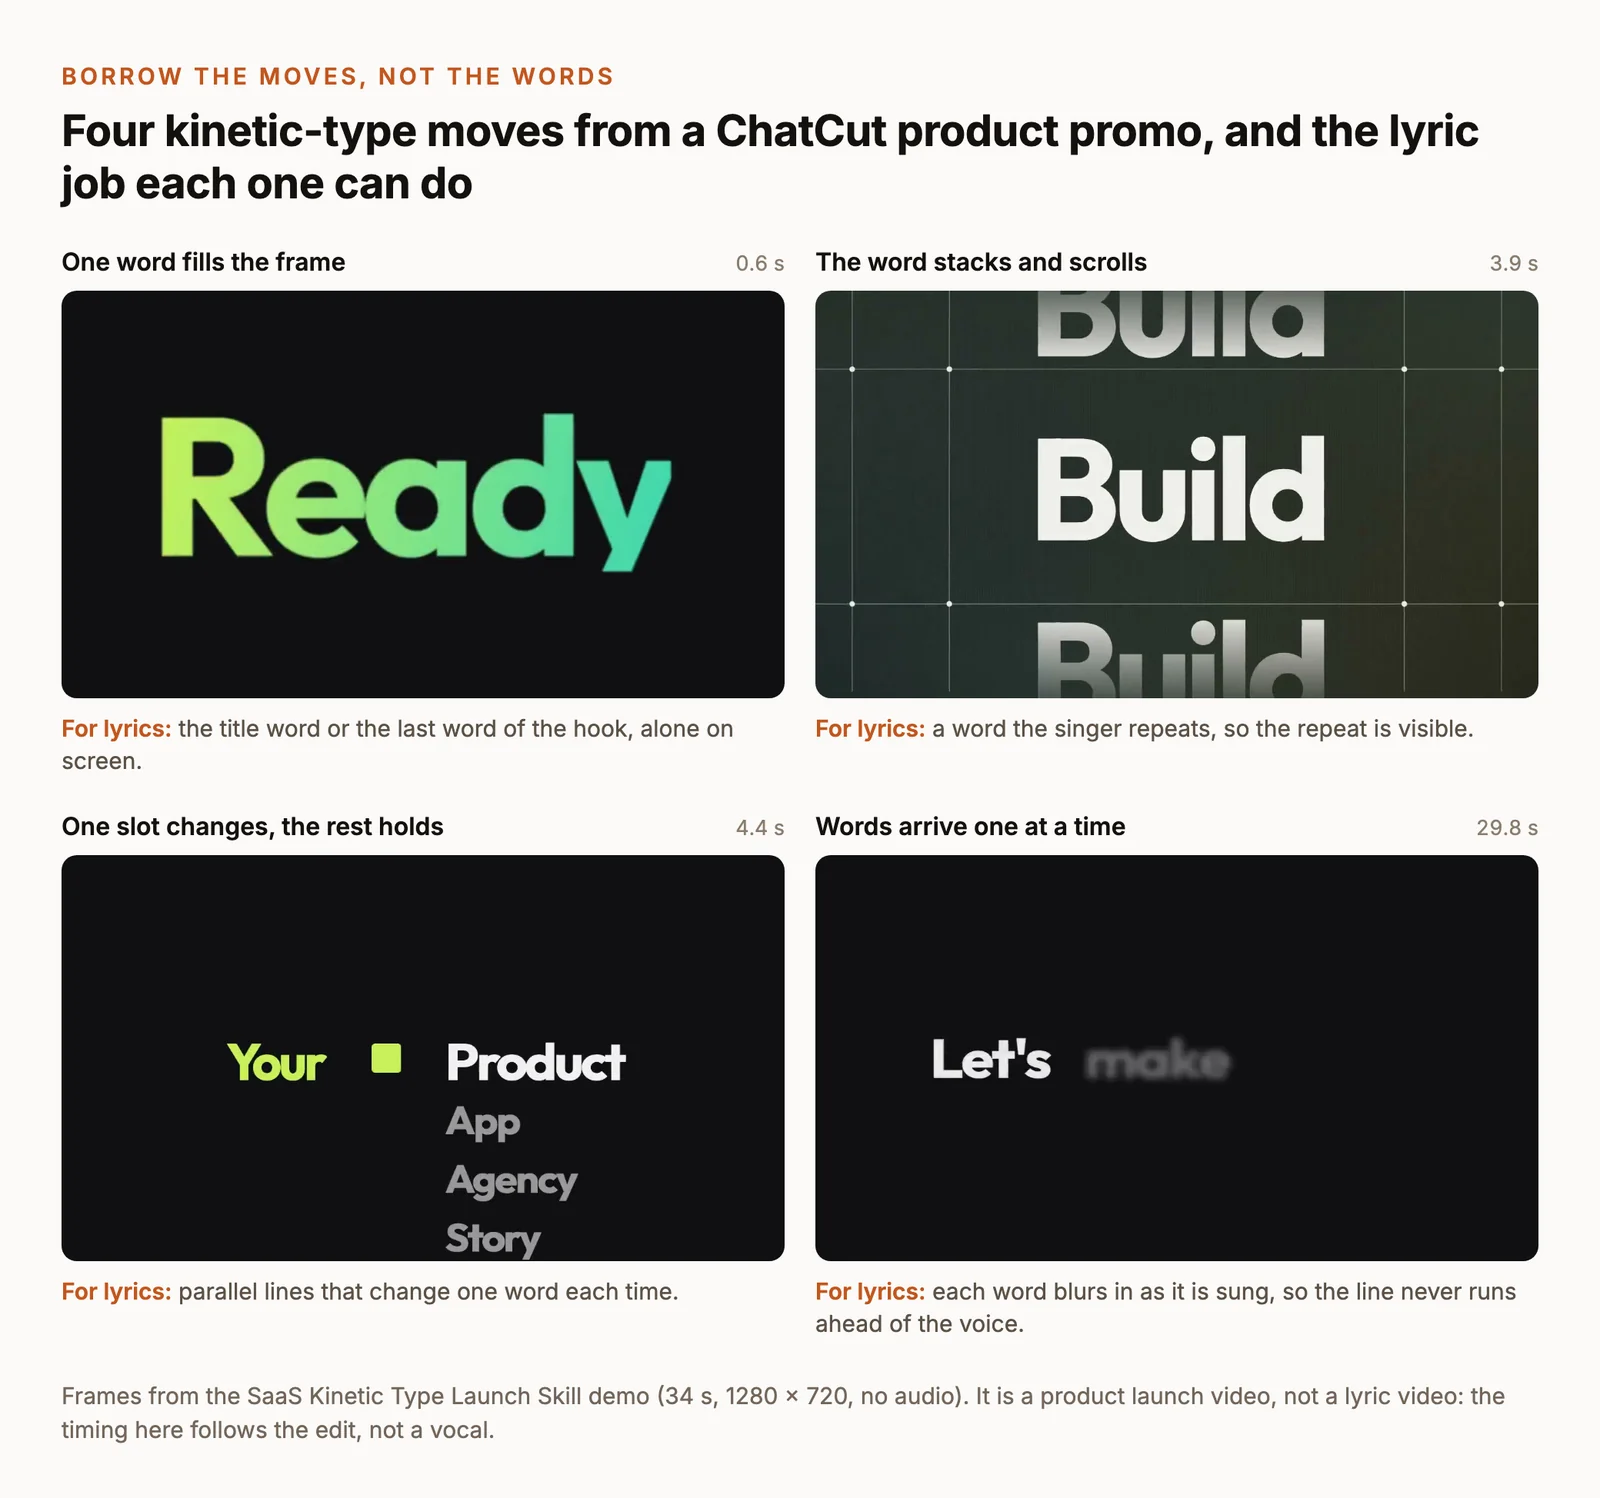
Build the section in ChatCut
In ChatCut, lyric text is built as Motion Graphics: animated text layers on the timeline that you revise by asking the agent or by editing them directly. It runs as a desktop app for macOS and Windows and in the browser.
- Import the final mix with My Assets → Upload → Files… and drag it to the timeline.
- Fill in the in and out times for your test section (the next part of this guide covers how).
- Ask the agent for the section, giving it the exact phrases and times. Type
@and pick your track in place of@song:
- Review it in the Viewer against your cue sheet. To change text, font or color, select the graphic and edit it on the canvas (direct editing needs ChatCut Desktop 0.3.13 or later). For changes to the animation itself, ask the agent and name exactly what should change.
- When the section works, paste the rest of the cue sheet and ask for the whole song in the same style. Selecting a Design Style keeps later graphics consistent, and Add as template to Favorite in My Assets saves the look for the next single.
Generating Motion Graphics uses credits, so approve the test section before you ask for forty more. ChatCut’s transcription is built for speech, and its documentation doesn’t cover sung vocals, so supply the timings yourself rather than asking it to find them. The Motion Graphics guide covers templates and editing, and how to make motion graphics covers design choices beyond lyrics.
Build the section in After Effects or CapCut
After Effects gives the most control over individual words and letters. Put each phrase on its own text layer and trim the layer to its cue. Then choose Animation → Animate Text and a property such as Opacity or Position, and keyframe the Range Selector’s Start or End so the reveal travels across the line. Under Advanced, set Based On to Words for a word-by-word reveal. Adobe’s text animation guide covers the controls.
CapCut works line by line. Add each phrase with Text → Add text, drag the clip so it starts and ends with the vocal, and apply an in and out animation. In the mobile app, Text → Auto Lyrics can draft the text and timing when your region and version have it; treat the result as a first pass and correct it line by line.
Time every phrase to the vocal
Do the line timing first, for the whole song, before any word-by-word effects. A correctly timed static line beats a beautifully animated one that arrives late.
Find the in point by ear. Play the song, stop on the first syllable of each phrase, and write the time in your cue sheet. In ChatCut you can drop a marker there first (the Add marker shortcut is M) and come back to all of them later. The waveform helps when the vocal is loud, but in a dense mix your ears are more reliable. If you can get a vocals-only stem from whoever mixed the song, put it on a muted track under the song; the waveform then shows exactly where each word starts.
Set the out point with the reader in mind. Clear the phrase when its last note ends. If the gap to the next phrase is shorter than about half a second, hold the line until the next one replaces it, so the screen doesn’t flash empty.
Watch for the usual problems:
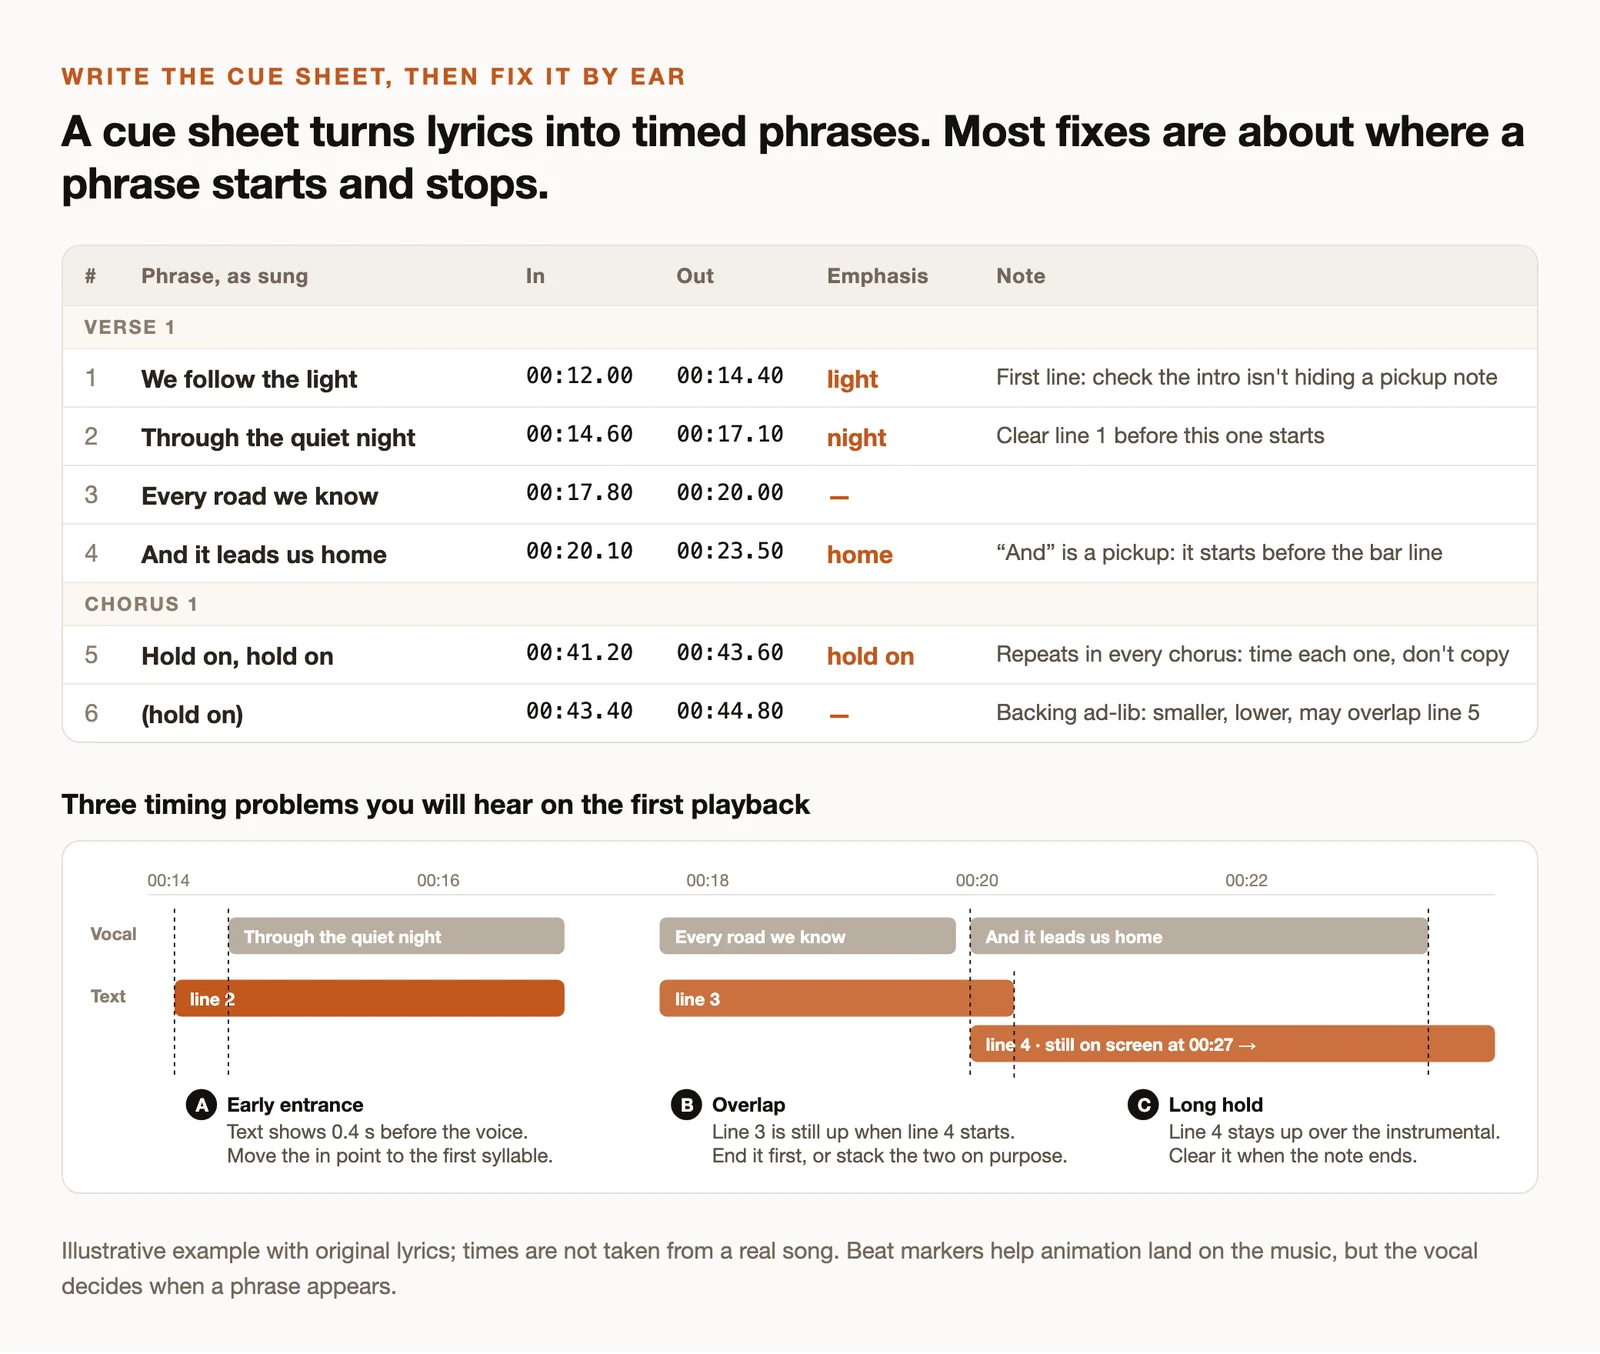
- Pickup words such as “and” or “so” often start before the beat. Start the phrase with them, not with the bar line.
- Held notes stretch one word over several beats. Keep that word on screen for the whole note instead of moving on early.
- Repeated choruses are rarely sung identically. Time each one by ear; copying the first chorus’s timing usually drifts.
- Ad-libs and backing vocals can be smaller, dimmer or left out. Show them only if they help.
Beat markers help animation land on the music, such as a word that pops on the snare, but the vocal decides when a phrase appears. Once the lines are right, add word-by-word timing only where it pays off, usually the hook and the title line.
Review in short loops. Play ten seconds at a time with sound and look only at the text, then watch the whole song once without stopping. Fix every line that feels early or late as you find it.
Export and check the YouTube version
For YouTube, export 16:9 MP4 with H.264 at the frame rate of your project. YouTube’s upload recommendations ask for MP4 and H.264, uploading at the frame rate the video was made, and suggest 8 Mbps for 1080p SDR at 24 to 30 fps.
In ChatCut, open Export → Video. ChatCut Desktop renders on your computer at up to 4K, with resolution, frame rate, bitrate and range settings, and saves to a folder you choose; keep the app open while it renders. Exports from the web editor that render in the cloud go up to 1080p. Exporting doesn’t use credits. For the vertical chorus cut, set Aspect Ratio → 9:16 below the Viewer, check that every phrase still fits, and export again. The export guide lists the settings.
Then watch the exported file, not the timeline, and check:
- Every word against the lyric sheet, including the repeats.
- The first and last phrases. The first often arrives early after an intro; the last is easy to cut off.
- The audio tail. Let the final note and its reverb finish before the video ends.
- Readability on a phone, at full brightness and at half.
- Sync from start to finish. Spot-check the last chorus as carefully as the first; a late line near the end is easy to miss when you only check the opening.